Styling
New in version 0.17.1
Provisional: This is a new feature and still under development. We’ll be adding features and possibly making breaking changes in future releases. We’d love to hear your feedback.
This document is written as a Jupyter Notebook, and can be viewed or downloaded here.
You can apply conditional formatting, the visual styling of a
DataFrame depending on the data within, by using the DataFrame.style
property. This is a property that returns a Styler object, which has
useful methods for formatting and displaying DataFrames.
The styling is accomplished using CSS. You write “style functions” that
take scalars, DataFrames or Series, and return like-indexed
DataFrames or Series with CSS "attribute: value" pairs for the
values. These functions can be incrementally passed to the Styler
which collects the styles before rendering.
Building Styles
Pass your style functions into one of the following methods:
Styler.applymap: elementwiseStyler.apply: column-/row-/table-wise
Both of those methods take a function (and some other keyword arguments)
and applies your function to the DataFrame in a certain way.
Styler.applymap works through the DataFrame elementwise.
Styler.apply passes each column or row into your DataFrame
one-at-a-time or the entire table at once, depending on the axis
keyword argument. For columnwise use axis=0, rowwise use axis=1,
and for the entire table at once use axis=None.
For Styler.applymap your function should take a scalar and return a
single string with the CSS attribute-value pair.
For Styler.apply your function should take a Series or DataFrame
(depending on the axis parameter), and return a Series or DataFrame with
an identical shape where each value is a string with a CSS
attribute-value pair.
Let’s see some examples.
In [2]:
import pandas as pd
import numpy as np

np.random.seed(24)
df = pd.DataFrame({'A': np.linspace(1, 10, 10)})
df = pd.concat([df, pd.DataFrame(np.random.randn(10, 4), columns=list('BCDE'))],
               axis=1)
df.iloc[0, 2] = np.nan
Here’s a boring example of rendering a DataFrame, without any (visible) styles:
In [3]:
df.style
Out[3]:
| A | B | C | D | E | |
|---|---|---|---|---|---|
| 0 | 1 | 1.32921 | nan | -0.31628 | -0.99081 |
| 1 | 2 | -1.07082 | -1.43871 | 0.564417 | 0.295722 |
| 2 | 3 | -1.6264 | 0.219565 | 0.678805 | 1.88927 |
| 3 | 4 | 0.961538 | 0.104011 | -0.481165 | 0.850229 |
| 4 | 5 | 1.45342 | 1.05774 | 0.165562 | 0.515018 |
| 5 | 6 | -1.33694 | 0.562861 | 1.39285 | -0.063328 |
| 6 | 7 | 0.121668 | 1.2076 | -0.00204021 | 1.6278 |
| 7 | 8 | 0.354493 | 1.03753 | -0.385684 | 0.519818 |
| 8 | 9 | 1.68658 | -1.32596 | 1.42898 | -2.08935 |
| 9 | 10 | -0.12982 | 0.631523 | -0.586538 | 0.29072 |
Note: The DataFrame.style attribute is a property that returns a
Styler object. Styler has a _repr_html_ method defined on it
so they are rendered automatically. If you want the actual HTML back for
further processing or for writing to file call the .render() method
which returns a string.
The above output looks very similar to the standard DataFrame HTML
representation. But we’ve done some work behind the scenes to attach CSS
classes to each cell. We can view these by calling the .render
method.
In [4]:
df.style.highlight_null().render().split('\n')[:10]
Out[4]:
['<style  type="text/css" >',
 '    #T_aba8ea1a_5922_11e8_a502_186590cd1c87row0_col2 {',
 '            background-color:  red;',
 '        }</style>  ',
 '<table id="T_aba8ea1a_5922_11e8_a502_186590cd1c87" > ',
 '<thead>    <tr> ',
 '        <th class="blank level0" ></th> ',
 '        <th class="col_heading level0 col0" >A</th> ',
 '        <th class="col_heading level0 col1" >B</th> ',
 '        <th class="col_heading level0 col2" >C</th> ']
The row0_col2 is the identifier for that particular cell. We’ve also
prepended each row/column identifier with a UUID unique to each
DataFrame so that the style from one doesn’t collide with the styling
from another within the same notebook or page (you can set the uuid
if you’d like to tie together the styling of two DataFrames).
When writing style functions, you take care of producing the CSS attribute / value pairs you want. Pandas matches those up with the CSS classes that identify each cell.
Let’s write a simple style function that will color negative numbers red and positive numbers black.
In [5]:
def color_negative_red(val):
    """
    Takes a scalar and returns a string with
    the css property `'color: red'` for negative
    strings, black otherwise.
    """
    color = 'red' if val < 0 else 'black'
    return 'color: %s' % color
In this case, the cell’s style depends only on it’s own value. That
means we should use the Styler.applymap method which works
elementwise.
In [6]:
s = df.style.applymap(color_negative_red)
s
Out[6]:
| A | B | C | D | E | |
|---|---|---|---|---|---|
| 0 | 1 | 1.32921 | nan | -0.31628 | -0.99081 |
| 1 | 2 | -1.07082 | -1.43871 | 0.564417 | 0.295722 |
| 2 | 3 | -1.6264 | 0.219565 | 0.678805 | 1.88927 |
| 3 | 4 | 0.961538 | 0.104011 | -0.481165 | 0.850229 |
| 4 | 5 | 1.45342 | 1.05774 | 0.165562 | 0.515018 |
| 5 | 6 | -1.33694 | 0.562861 | 1.39285 | -0.063328 |
| 6 | 7 | 0.121668 | 1.2076 | -0.00204021 | 1.6278 |
| 7 | 8 | 0.354493 | 1.03753 | -0.385684 | 0.519818 |
| 8 | 9 | 1.68658 | -1.32596 | 1.42898 | -2.08935 |
| 9 | 10 | -0.12982 | 0.631523 | -0.586538 | 0.29072 |
Notice the similarity with the standard df.applymap, which operates
on DataFrames elementwise. We want you to be able to reuse your existing
knowledge of how to interact with DataFrames.
Notice also that our function returned a string containing the CSS
attribute and value, separated by a colon just like in a <style>
tag. This will be a common theme.
Finally, the input shapes matched. Styler.applymap calls the
function on each scalar input, and the function returns a scalar output.
Now suppose you wanted to highlight the maximum value in each column. We
can’t use .applymap anymore since that operated elementwise.
Instead, we’ll turn to .apply which operates columnwise (or rowwise
using the axis keyword). Later on we’ll see that something like
highlight_max is already defined on Styler so you wouldn’t need
to write this yourself.
In [7]:
def highlight_max(s):
    '''
    highlight the maximum in a Series yellow.
    '''
    is_max = s == s.max()
    return ['background-color: yellow' if v else '' for v in is_max]
In [8]:
df.style.apply(highlight_max)
Out[8]:
| A | B | C | D | E | |
|---|---|---|---|---|---|
| 0 | 1 | 1.32921 | nan | -0.31628 | -0.99081 |
| 1 | 2 | -1.07082 | -1.43871 | 0.564417 | 0.295722 |
| 2 | 3 | -1.6264 | 0.219565 | 0.678805 | 1.88927 |
| 3 | 4 | 0.961538 | 0.104011 | -0.481165 | 0.850229 |
| 4 | 5 | 1.45342 | 1.05774 | 0.165562 | 0.515018 |
| 5 | 6 | -1.33694 | 0.562861 | 1.39285 | -0.063328 |
| 6 | 7 | 0.121668 | 1.2076 | -0.00204021 | 1.6278 |
| 7 | 8 | 0.354493 | 1.03753 | -0.385684 | 0.519818 |
| 8 | 9 | 1.68658 | -1.32596 | 1.42898 | -2.08935 |
| 9 | 10 | -0.12982 | 0.631523 | -0.586538 | 0.29072 |
In this case the input is a Series, one column at a time. Notice
that the output shape of highlight_max matches the input shape, an
array with len(s) items.
We encourage you to use method chains to build up a style piecewise, before finally rending at the end of the chain.
In [9]:
df.style.\
    applymap(color_negative_red).\
    apply(highlight_max)
Out[9]:
| A | B | C | D | E | |
|---|---|---|---|---|---|
| 0 | 1 | 1.32921 | nan | -0.31628 | -0.99081 |
| 1 | 2 | -1.07082 | -1.43871 | 0.564417 | 0.295722 |
| 2 | 3 | -1.6264 | 0.219565 | 0.678805 | 1.88927 |
| 3 | 4 | 0.961538 | 0.104011 | -0.481165 | 0.850229 |
| 4 | 5 | 1.45342 | 1.05774 | 0.165562 | 0.515018 |
| 5 | 6 | -1.33694 | 0.562861 | 1.39285 | -0.063328 |
| 6 | 7 | 0.121668 | 1.2076 | -0.00204021 | 1.6278 |
| 7 | 8 | 0.354493 | 1.03753 | -0.385684 | 0.519818 |
| 8 | 9 | 1.68658 | -1.32596 | 1.42898 | -2.08935 |
| 9 | 10 | -0.12982 | 0.631523 | -0.586538 | 0.29072 |
Above we used Styler.apply to pass in each column one at a time.
Debugging Tip: If you’re having trouble writing your style function, try just passing it into DataFrame.apply. Internally, Styler.apply uses DataFrame.apply so the result should be the same.
What if you wanted to highlight just the maximum value in the entire
table? Use .apply(function, axis=None) to indicate that your
function wants the entire table, not one column or row at a time. Let’s
try that next.
We’ll rewrite our highlight-max to handle either Series (from
.apply(axis=0 or 1)) or DataFrames (from .apply(axis=None)).
We’ll also allow the color to be adjustable, to demonstrate that
.apply, and .applymap pass along keyword arguments.
In [10]:
def highlight_max(data, color='yellow'):
    '''
    highlight the maximum in a Series or DataFrame
    '''
    attr = 'background-color: {}'.format(color)
    if data.ndim == 1:  # Series from .apply(axis=0) or axis=1
        is_max = data == data.max()
        return [attr if v else '' for v in is_max]
    else:  # from .apply(axis=None)
        is_max = data == data.max().max()
        return pd.DataFrame(np.where(is_max, attr, ''),
                            index=data.index, columns=data.columns)
When using Styler.apply(func, axis=None), the function must return a
DataFrame with the same index and column labels.
In [11]:
df.style.apply(highlight_max, color='darkorange', axis=None)
Out[11]:
| A | B | C | D | E | |
|---|---|---|---|---|---|
| 0 | 1 | 1.32921 | nan | -0.31628 | -0.99081 |
| 1 | 2 | -1.07082 | -1.43871 | 0.564417 | 0.295722 |
| 2 | 3 | -1.6264 | 0.219565 | 0.678805 | 1.88927 |
| 3 | 4 | 0.961538 | 0.104011 | -0.481165 | 0.850229 |
| 4 | 5 | 1.45342 | 1.05774 | 0.165562 | 0.515018 |
| 5 | 6 | -1.33694 | 0.562861 | 1.39285 | -0.063328 |
| 6 | 7 | 0.121668 | 1.2076 | -0.00204021 | 1.6278 |
| 7 | 8 | 0.354493 | 1.03753 | -0.385684 | 0.519818 |
| 8 | 9 | 1.68658 | -1.32596 | 1.42898 | -2.08935 |
| 9 | 10 | -0.12982 | 0.631523 | -0.586538 | 0.29072 |
Building Styles Summary
Style functions should return strings with one or more CSS
attribute: value delimited by semicolons. Use
Styler.applymap(func)for elementwise stylesStyler.apply(func, axis=0)for columnwise stylesStyler.apply(func, axis=1)for rowwise stylesStyler.apply(func, axis=None)for tablewise styles
And crucially the input and output shapes of func must match. If
x is the input then func(x).shape == x.shape.
Finer Control: Slicing
Both Styler.apply, and Styler.applymap accept a subset
keyword. This allows you to apply styles to specific rows or columns,
without having to code that logic into your style function.
The value passed to subset behaves similar to slicing a DataFrame.
- A scalar is treated as a column label
- A list (or series or numpy array)
- A tuple is treated as
(row_indexer, column_indexer)
Consider using pd.IndexSlice to construct the tuple for the last
one.
In [12]:
df.style.apply(highlight_max, subset=['B', 'C', 'D'])
Out[12]:
| A | B | C | D | E | |
|---|---|---|---|---|---|
| 0 | 1 | 1.32921 | nan | -0.31628 | -0.99081 |
| 1 | 2 | -1.07082 | -1.43871 | 0.564417 | 0.295722 |
| 2 | 3 | -1.6264 | 0.219565 | 0.678805 | 1.88927 |
| 3 | 4 | 0.961538 | 0.104011 | -0.481165 | 0.850229 |
| 4 | 5 | 1.45342 | 1.05774 | 0.165562 | 0.515018 |
| 5 | 6 | -1.33694 | 0.562861 | 1.39285 | -0.063328 |
| 6 | 7 | 0.121668 | 1.2076 | -0.00204021 | 1.6278 |
| 7 | 8 | 0.354493 | 1.03753 | -0.385684 | 0.519818 |
| 8 | 9 | 1.68658 | -1.32596 | 1.42898 | -2.08935 |
| 9 | 10 | -0.12982 | 0.631523 | -0.586538 | 0.29072 |
For row and column slicing, any valid indexer to .loc will work.
In [13]:
df.style.applymap(color_negative_red,
                  subset=pd.IndexSlice[2:5, ['B', 'D']])
Out[13]:
| A | B | C | D | E | |
|---|---|---|---|---|---|
| 0 | 1 | 1.32921 | nan | -0.31628 | -0.99081 |
| 1 | 2 | -1.07082 | -1.43871 | 0.564417 | 0.295722 |
| 2 | 3 | -1.6264 | 0.219565 | 0.678805 | 1.88927 |
| 3 | 4 | 0.961538 | 0.104011 | -0.481165 | 0.850229 |
| 4 | 5 | 1.45342 | 1.05774 | 0.165562 | 0.515018 |
| 5 | 6 | -1.33694 | 0.562861 | 1.39285 | -0.063328 |
| 6 | 7 | 0.121668 | 1.2076 | -0.00204021 | 1.6278 |
| 7 | 8 | 0.354493 | 1.03753 | -0.385684 | 0.519818 |
| 8 | 9 | 1.68658 | -1.32596 | 1.42898 | -2.08935 |
| 9 | 10 | -0.12982 | 0.631523 | -0.586538 | 0.29072 |
Only label-based slicing is supported right now, not positional.
If your style function uses a subset or axis keyword argument,
consider wrapping your function in a functools.partial, partialing
out that keyword.
my_func2 = functools.partial(my_func, subset=42)
Finer Control: Display Values
We distinguish the display value from the actual value in
Styler. To control the display value, the text is printed in each
cell, use Styler.format. Cells can be formatted according to a
format spec
string
or a callable that takes a single value and returns a string.
In [14]:
df.style.format("{:.2%}")
Out[14]:
| A | B | C | D | E | |
|---|---|---|---|---|---|
| 0 | 100.00% | 132.92% | nan% | -31.63% | -99.08% |
| 1 | 200.00% | -107.08% | -143.87% | 56.44% | 29.57% |
| 2 | 300.00% | -162.64% | 21.96% | 67.88% | 188.93% |
| 3 | 400.00% | 96.15% | 10.40% | -48.12% | 85.02% |
| 4 | 500.00% | 145.34% | 105.77% | 16.56% | 51.50% |
| 5 | 600.00% | -133.69% | 56.29% | 139.29% | -6.33% |
| 6 | 700.00% | 12.17% | 120.76% | -0.20% | 162.78% |
| 7 | 800.00% | 35.45% | 103.75% | -38.57% | 51.98% |
| 8 | 900.00% | 168.66% | -132.60% | 142.90% | -208.94% |
| 9 | 1000.00% | -12.98% | 63.15% | -58.65% | 29.07% |
Use a dictionary to format specific columns.
In [15]:
df.style.format({'B': "{:0<4.0f}", 'D': '{:+.2f}'})
Out[15]:
| A | B | C | D | E | |
|---|---|---|---|---|---|
| 0 | 1 | 1000 | nan | -0.32 | -0.99081 |
| 1 | 2 | -100 | -1.43871 | +0.56 | 0.295722 |
| 2 | 3 | -200 | 0.219565 | +0.68 | 1.88927 |
| 3 | 4 | 1000 | 0.104011 | -0.48 | 0.850229 |
| 4 | 5 | 1000 | 1.05774 | +0.17 | 0.515018 |
| 5 | 6 | -100 | 0.562861 | +1.39 | -0.063328 |
| 6 | 7 | 0000 | 1.2076 | -0.00 | 1.6278 |
| 7 | 8 | 0000 | 1.03753 | -0.39 | 0.519818 |
| 8 | 9 | 2000 | -1.32596 | +1.43 | -2.08935 |
| 9 | 10 | -000 | 0.631523 | -0.59 | 0.29072 |
Or pass in a callable (or dictionary of callables) for more flexible handling.
In [16]:
df.style.format({"B": lambda x: "±{:.2f}".format(abs(x))})
Out[16]:
| A | B | C | D | E | |
|---|---|---|---|---|---|
| 0 | 1 | ±1.33 | nan | -0.31628 | -0.99081 |
| 1 | 2 | ±1.07 | -1.43871 | 0.564417 | 0.295722 |
| 2 | 3 | ±1.63 | 0.219565 | 0.678805 | 1.88927 |
| 3 | 4 | ±0.96 | 0.104011 | -0.481165 | 0.850229 |
| 4 | 5 | ±1.45 | 1.05774 | 0.165562 | 0.515018 |
| 5 | 6 | ±1.34 | 0.562861 | 1.39285 | -0.063328 |
| 6 | 7 | ±0.12 | 1.2076 | -0.00204021 | 1.6278 |
| 7 | 8 | ±0.35 | 1.03753 | -0.385684 | 0.519818 |
| 8 | 9 | ±1.69 | -1.32596 | 1.42898 | -2.08935 |
| 9 | 10 | ±0.13 | 0.631523 | -0.586538 | 0.29072 |
Builtin Styles
Finally, we expect certain styling functions to be common enough that
we’ve included a few “built-in” to the Styler, so you don’t have to
write them yourself.
In [17]:
df.style.highlight_null(null_color='red')
Out[17]:
| A | B | C | D | E | |
|---|---|---|---|---|---|
| 0 | 1 | 1.32921 | nan | -0.31628 | -0.99081 |
| 1 | 2 | -1.07082 | -1.43871 | 0.564417 | 0.295722 |
| 2 | 3 | -1.6264 | 0.219565 | 0.678805 | 1.88927 |
| 3 | 4 | 0.961538 | 0.104011 | -0.481165 | 0.850229 |
| 4 | 5 | 1.45342 | 1.05774 | 0.165562 | 0.515018 |
| 5 | 6 | -1.33694 | 0.562861 | 1.39285 | -0.063328 |
| 6 | 7 | 0.121668 | 1.2076 | -0.00204021 | 1.6278 |
| 7 | 8 | 0.354493 | 1.03753 | -0.385684 | 0.519818 |
| 8 | 9 | 1.68658 | -1.32596 | 1.42898 | -2.08935 |
| 9 | 10 | -0.12982 | 0.631523 | -0.586538 | 0.29072 |
You can create “heatmaps” with the background_gradient method. These
require matplotlib, and we’ll use
Seaborn to get a
nice colormap.
In [18]:
import seaborn as sns

cm = sns.light_palette("green", as_cmap=True)

s = df.style.background_gradient(cmap=cm)
s
/Users/taugspurger/miniconda3/envs/travis-36-doc/lib/python3.6/site-packages/matplotlib/colors.py:504: RuntimeWarning: invalid value encountered in less
  xa[xa < 0] = -1
Out[18]:
| A | B | C | D | E | |
|---|---|---|---|---|---|
| 0 | 1 | 1.32921 | nan | -0.31628 | -0.99081 |
| 1 | 2 | -1.07082 | -1.43871 | 0.564417 | 0.295722 |
| 2 | 3 | -1.6264 | 0.219565 | 0.678805 | 1.88927 |
| 3 | 4 | 0.961538 | 0.104011 | -0.481165 | 0.850229 |
| 4 | 5 | 1.45342 | 1.05774 | 0.165562 | 0.515018 |
| 5 | 6 | -1.33694 | 0.562861 | 1.39285 | -0.063328 |
| 6 | 7 | 0.121668 | 1.2076 | -0.00204021 | 1.6278 |
| 7 | 8 | 0.354493 | 1.03753 | -0.385684 | 0.519818 |
| 8 | 9 | 1.68658 | -1.32596 | 1.42898 | -2.08935 |
| 9 | 10 | -0.12982 | 0.631523 | -0.586538 | 0.29072 |
Styler.background_gradient takes the keyword arguments low and
high. Roughly speaking these extend the range of your data by
low and high percent so that when we convert the colors, the
colormap’s entire range isn’t used. This is useful so that you can
actually read the text still.
In [19]:
# Uses the full color range
df.loc[:4].style.background_gradient(cmap='viridis')
/Users/taugspurger/miniconda3/envs/travis-36-doc/lib/python3.6/site-packages/matplotlib/colors.py:504: RuntimeWarning: invalid value encountered in less
  xa[xa < 0] = -1
Out[19]:
| A | B | C | D | E | |
|---|---|---|---|---|---|
| 0 | 1 | 1.32921 | nan | -0.31628 | -0.99081 |
| 1 | 2 | -1.07082 | -1.43871 | 0.564417 | 0.295722 |
| 2 | 3 | -1.6264 | 0.219565 | 0.678805 | 1.88927 |
| 3 | 4 | 0.961538 | 0.104011 | -0.481165 | 0.850229 |
| 4 | 5 | 1.45342 | 1.05774 | 0.165562 | 0.515018 |
In [20]:
# Compress the color range
(df.loc[:4]
    .style
    .background_gradient(cmap='viridis', low=.5, high=0)
    .highlight_null('red'))
/Users/taugspurger/miniconda3/envs/travis-36-doc/lib/python3.6/site-packages/matplotlib/colors.py:504: RuntimeWarning: invalid value encountered in less
  xa[xa < 0] = -1
Out[20]:
| A | B | C | D | E | |
|---|---|---|---|---|---|
| 0 | 1 | 1.32921 | nan | -0.31628 | -0.99081 |
| 1 | 2 | -1.07082 | -1.43871 | 0.564417 | 0.295722 |
| 2 | 3 | -1.6264 | 0.219565 | 0.678805 | 1.88927 |
| 3 | 4 | 0.961538 | 0.104011 | -0.481165 | 0.850229 |
| 4 | 5 | 1.45342 | 1.05774 | 0.165562 | 0.515018 |
There’s also .highlight_min and .highlight_max.
In [21]:
df.style.highlight_max(axis=0)
Out[21]:
| A | B | C | D | E | |
|---|---|---|---|---|---|
| 0 | 1 | 1.32921 | nan | -0.31628 | -0.99081 |
| 1 | 2 | -1.07082 | -1.43871 | 0.564417 | 0.295722 |
| 2 | 3 | -1.6264 | 0.219565 | 0.678805 | 1.88927 |
| 3 | 4 | 0.961538 | 0.104011 | -0.481165 | 0.850229 |
| 4 | 5 | 1.45342 | 1.05774 | 0.165562 | 0.515018 |
| 5 | 6 | -1.33694 | 0.562861 | 1.39285 | -0.063328 |
| 6 | 7 | 0.121668 | 1.2076 | -0.00204021 | 1.6278 |
| 7 | 8 | 0.354493 | 1.03753 | -0.385684 | 0.519818 |
| 8 | 9 | 1.68658 | -1.32596 | 1.42898 | -2.08935 |
| 9 | 10 | -0.12982 | 0.631523 | -0.586538 | 0.29072 |
Use Styler.set_properties when the style doesn’t actually depend on
the values.
In [22]:
df.style.set_properties(**{'background-color': 'black',
                           'color': 'lawngreen',
                           'border-color': 'white'})
Out[22]:
| A | B | C | D | E | |
|---|---|---|---|---|---|
| 0 | 1 | 1.32921 | nan | -0.31628 | -0.99081 |
| 1 | 2 | -1.07082 | -1.43871 | 0.564417 | 0.295722 |
| 2 | 3 | -1.6264 | 0.219565 | 0.678805 | 1.88927 |
| 3 | 4 | 0.961538 | 0.104011 | -0.481165 | 0.850229 |
| 4 | 5 | 1.45342 | 1.05774 | 0.165562 | 0.515018 |
| 5 | 6 | -1.33694 | 0.562861 | 1.39285 | -0.063328 |
| 6 | 7 | 0.121668 | 1.2076 | -0.00204021 | 1.6278 |
| 7 | 8 | 0.354493 | 1.03753 | -0.385684 | 0.519818 |
| 8 | 9 | 1.68658 | -1.32596 | 1.42898 | -2.08935 |
| 9 | 10 | -0.12982 | 0.631523 | -0.586538 | 0.29072 |
Bar charts
You can include “bar charts” in your DataFrame.
In [23]:
df.style.bar(subset=['A', 'B'], color='#d65f5f')
Out[23]:
| A | B | C | D | E | |
|---|---|---|---|---|---|
| 0 | 1 | 1.32921 | nan | -0.31628 | -0.99081 |
| 1 | 2 | -1.07082 | -1.43871 | 0.564417 | 0.295722 |
| 2 | 3 | -1.6264 | 0.219565 | 0.678805 | 1.88927 |
| 3 | 4 | 0.961538 | 0.104011 | -0.481165 | 0.850229 |
| 4 | 5 | 1.45342 | 1.05774 | 0.165562 | 0.515018 |
| 5 | 6 | -1.33694 | 0.562861 | 1.39285 | -0.063328 |
| 6 | 7 | 0.121668 | 1.2076 | -0.00204021 | 1.6278 |
| 7 | 8 | 0.354493 | 1.03753 | -0.385684 | 0.519818 |
| 8 | 9 | 1.68658 | -1.32596 | 1.42898 | -2.08935 |
| 9 | 10 | -0.12982 | 0.631523 | -0.586538 | 0.29072 |
New in version 0.20.0 is the ability to customize further the bar chart:
You can now have the df.style.bar be centered on zero or midpoint
value (in addition to the already existing way of having the min value
at the left side of the cell), and you can pass a list of
[color_negative, color_positive].
Here’s how you can change the above with the new align='mid' option:
In [24]:
df.style.bar(subset=['A', 'B'], align='mid', color=['#d65f5f', '#5fba7d'])
Out[24]:
| A | B | C | D | E | |
|---|---|---|---|---|---|
| 0 | 1 | 1.32921 | nan | -0.31628 | -0.99081 |
| 1 | 2 | -1.07082 | -1.43871 | 0.564417 | 0.295722 |
| 2 | 3 | -1.6264 | 0.219565 | 0.678805 | 1.88927 |
| 3 | 4 | 0.961538 | 0.104011 | -0.481165 | 0.850229 |
| 4 | 5 | 1.45342 | 1.05774 | 0.165562 | 0.515018 |
| 5 | 6 | -1.33694 | 0.562861 | 1.39285 | -0.063328 |
| 6 | 7 | 0.121668 | 1.2076 | -0.00204021 | 1.6278 |
| 7 | 8 | 0.354493 | 1.03753 | -0.385684 | 0.519818 |
| 8 | 9 | 1.68658 | -1.32596 | 1.42898 | -2.08935 |
| 9 | 10 | -0.12982 | 0.631523 | -0.586538 | 0.29072 |
The following example aims to give a highlight of the behavior of the new align options:
In [25]:
import pandas as pd
from IPython.display import HTML

# Test series
test1 = pd.Series([-100,-60,-30,-20], name='All Negative')
test2 = pd.Series([10,20,50,100], name='All Positive')
test3 = pd.Series([-10,-5,0,90], name='Both Pos and Neg')

head = """
<table>
    <thead>
        <th>Align</th>
        <th>All Negative</th>
        <th>All Positive</th>
        <th>Both Neg and Pos</th>
    </thead>
    </tbody>

"""

aligns = ['left','zero','mid']
for align in aligns:
    row = "<tr><th>{}</th>".format(align)
    for serie in [test1,test2,test3]:
        s = serie.copy()
        s.name=''
        row += "<td>{}</td>".format(s.to_frame().style.bar(align=align,
                                                           color=['#d65f5f', '#5fba7d'],
                                                           width=100).render()) #testn['width']
    row += '</tr>'
    head += row

head+= """
</tbody>
</table>"""


HTML(head)
Out[25]:
| Align | All Negative | All Positive | Both Neg and Pos | ||||||||||||||||||||||||||||||
|---|---|---|---|---|---|---|---|---|---|---|---|---|---|---|---|---|---|---|---|---|---|---|---|---|---|---|---|---|---|---|---|---|---|
| left |
|
|
| ||||||||||||||||||||||||||||||
| zero |
|
|
| ||||||||||||||||||||||||||||||
| mid |
|
|
|
Sharing Styles
Say you have a lovely style built up for a DataFrame, and now you want
to apply the same style to a second DataFrame. Export the style with
df1.style.export, and import it on the second DataFrame with
df1.style.set
In [26]:
df2 = -df
style1 = df.style.applymap(color_negative_red)
style1
Out[26]:
| A | B | C | D | E | |
|---|---|---|---|---|---|
| 0 | 1 | 1.32921 | nan | -0.31628 | -0.99081 |
| 1 | 2 | -1.07082 | -1.43871 | 0.564417 | 0.295722 |
| 2 | 3 | -1.6264 | 0.219565 | 0.678805 | 1.88927 |
| 3 | 4 | 0.961538 | 0.104011 | -0.481165 | 0.850229 |
| 4 | 5 | 1.45342 | 1.05774 | 0.165562 | 0.515018 |
| 5 | 6 | -1.33694 | 0.562861 | 1.39285 | -0.063328 |
| 6 | 7 | 0.121668 | 1.2076 | -0.00204021 | 1.6278 |
| 7 | 8 | 0.354493 | 1.03753 | -0.385684 | 0.519818 |
| 8 | 9 | 1.68658 | -1.32596 | 1.42898 | -2.08935 |
| 9 | 10 | -0.12982 | 0.631523 | -0.586538 | 0.29072 |
In [27]:
style2 = df2.style
style2.use(style1.export())
style2
Out[27]:
| A | B | C | D | E | |
|---|---|---|---|---|---|
| 0 | -1 | -1.32921 | nan | 0.31628 | 0.99081 |
| 1 | -2 | 1.07082 | 1.43871 | -0.564417 | -0.295722 |
| 2 | -3 | 1.6264 | -0.219565 | -0.678805 | -1.88927 |
| 3 | -4 | -0.961538 | -0.104011 | 0.481165 | -0.850229 |
| 4 | -5 | -1.45342 | -1.05774 | -0.165562 | -0.515018 |
| 5 | -6 | 1.33694 | -0.562861 | -1.39285 | 0.063328 |
| 6 | -7 | -0.121668 | -1.2076 | 0.00204021 | -1.6278 |
| 7 | -8 | -0.354493 | -1.03753 | 0.385684 | -0.519818 |
| 8 | -9 | -1.68658 | 1.32596 | -1.42898 | 2.08935 |
| 9 | -10 | 0.12982 | -0.631523 | 0.586538 | -0.29072 |
Notice that you’re able share the styles even though they’re data aware.
The styles are re-evaluated on the new DataFrame they’ve been used
upon.
Other Options
You’ve seen a few methods for data-driven styling. Styler also
provides a few other options for styles that don’t depend on the data.
- precision
- captions
- table-wide styles
- hiding the index or columns
Each of these can be specified in two ways:
- A keyword argument to
Styler.__init__ - A call to one of the
.set_or.hide_methods, e.g..set_captionor.hide_columns
The best method to use depends on the context. Use the Styler
constructor when building many styled DataFrames that should all share
the same properties. For interactive use, the.set_ and .hide_
methods are more convenient.
Precision
You can control the precision of floats using pandas’ regular
display.precision option.
In [28]:
with pd.option_context('display.precision', 2):
    html = (df.style
              .applymap(color_negative_red)
              .apply(highlight_max))
html
Out[28]:
| A | B | C | D | E | |
|---|---|---|---|---|---|
| 0 | 1 | 1.3 | nan | -0.32 | -0.99 |
| 1 | 2 | -1.1 | -1.4 | 0.56 | 0.3 |
| 2 | 3 | -1.6 | 0.22 | 0.68 | 1.9 |
| 3 | 4 | 0.96 | 0.1 | -0.48 | 0.85 |
| 4 | 5 | 1.5 | 1.1 | 0.17 | 0.52 |
| 5 | 6 | -1.3 | 0.56 | 1.4 | -0.063 |
| 6 | 7 | 0.12 | 1.2 | -0.002 | 1.6 |
| 7 | 8 | 0.35 | 1 | -0.39 | 0.52 |
| 8 | 9 | 1.7 | -1.3 | 1.4 | -2.1 |
| 9 | 10 | -0.13 | 0.63 | -0.59 | 0.29 |
Or through a set_precision method.
In [29]:
df.style\
  .applymap(color_negative_red)\
  .apply(highlight_max)\
  .set_precision(2)
Out[29]:
| A | B | C | D | E | |
|---|---|---|---|---|---|
| 0 | 1 | 1.3 | nan | -0.32 | -0.99 |
| 1 | 2 | -1.1 | -1.4 | 0.56 | 0.3 |
| 2 | 3 | -1.6 | 0.22 | 0.68 | 1.9 |
| 3 | 4 | 0.96 | 0.1 | -0.48 | 0.85 |
| 4 | 5 | 1.5 | 1.1 | 0.17 | 0.52 |
| 5 | 6 | -1.3 | 0.56 | 1.4 | -0.063 |
| 6 | 7 | 0.12 | 1.2 | -0.002 | 1.6 |
| 7 | 8 | 0.35 | 1 | -0.39 | 0.52 |
| 8 | 9 | 1.7 | -1.3 | 1.4 | -2.1 |
| 9 | 10 | -0.13 | 0.63 | -0.59 | 0.29 |
Setting the precision only affects the printed number; the
full-precision values are always passed to your style functions. You can
always use df.round(2).style if you’d prefer to round from the
start.
Captions
Regular table captions can be added in a few ways.
In [30]:
df.style.set_caption('Colormaps, with a caption.')\
    .background_gradient(cmap=cm)
/Users/taugspurger/miniconda3/envs/travis-36-doc/lib/python3.6/site-packages/matplotlib/colors.py:504: RuntimeWarning: invalid value encountered in less
  xa[xa < 0] = -1
Out[30]:
| A | B | C | D | E | |
|---|---|---|---|---|---|
| 0 | 1 | 1.32921 | nan | -0.31628 | -0.99081 |
| 1 | 2 | -1.07082 | -1.43871 | 0.564417 | 0.295722 |
| 2 | 3 | -1.6264 | 0.219565 | 0.678805 | 1.88927 |
| 3 | 4 | 0.961538 | 0.104011 | -0.481165 | 0.850229 |
| 4 | 5 | 1.45342 | 1.05774 | 0.165562 | 0.515018 |
| 5 | 6 | -1.33694 | 0.562861 | 1.39285 | -0.063328 |
| 6 | 7 | 0.121668 | 1.2076 | -0.00204021 | 1.6278 |
| 7 | 8 | 0.354493 | 1.03753 | -0.385684 | 0.519818 |
| 8 | 9 | 1.68658 | -1.32596 | 1.42898 | -2.08935 |
| 9 | 10 | -0.12982 | 0.631523 | -0.586538 | 0.29072 |
Table Styles
The next option you have are “table styles”. These are styles that apply
to the table as a whole, but don’t look at the data. Certain sytlings,
including pseudo-selectors like :hover can only be used this way.
In [31]:
from IPython.display import HTML

def hover(hover_color="#ffff99"):
    return dict(selector="tr:hover",
                props=[("background-color", "%s" % hover_color)])

styles = [
    hover(),
    dict(selector="th", props=[("font-size", "150%"),
                               ("text-align", "center")]),
    dict(selector="caption", props=[("caption-side", "bottom")])
]
html = (df.style.set_table_styles(styles)
          .set_caption("Hover to highlight."))
html
Out[31]:
| A | B | C | D | E | |
|---|---|---|---|---|---|
| 0 | 1 | 1.32921 | nan | -0.31628 | -0.99081 |
| 1 | 2 | -1.07082 | -1.43871 | 0.564417 | 0.295722 |
| 2 | 3 | -1.6264 | 0.219565 | 0.678805 | 1.88927 |
| 3 | 4 | 0.961538 | 0.104011 | -0.481165 | 0.850229 |
| 4 | 5 | 1.45342 | 1.05774 | 0.165562 | 0.515018 |
| 5 | 6 | -1.33694 | 0.562861 | 1.39285 | -0.063328 |
| 6 | 7 | 0.121668 | 1.2076 | -0.00204021 | 1.6278 |
| 7 | 8 | 0.354493 | 1.03753 | -0.385684 | 0.519818 |
| 8 | 9 | 1.68658 | -1.32596 | 1.42898 | -2.08935 |
| 9 | 10 | -0.12982 | 0.631523 | -0.586538 | 0.29072 |
table_styles should be a list of dictionaries. Each dictionary
should have the selector and props keys. The value for
selector should be a valid CSS selector. Recall that all the styles
are already attached to an id, unique to each Styler. This
selector is in addition to that id. The value for props should
be a list of tuples of ('attribute', 'value').
table_styles are extremely flexible, but not as fun to type out by
hand. We hope to collect some useful ones either in pandas, or
preferable in a new package that builds on top the
tools here.
Hiding the Index or Columns
The index can be hidden from rendering by calling Styler.hide_index.
Columns can be hidden from rendering by calling Styler.hide_columns
and passing in the name of a column, or a slice of columns.
In [32]:
df.style.hide_index()
Out[32]:
| A | B | C | D | E |
|---|---|---|---|---|
| 1 | 1.32921 | nan | -0.31628 | -0.99081 |
| 2 | -1.07082 | -1.43871 | 0.564417 | 0.295722 |
| 3 | -1.6264 | 0.219565 | 0.678805 | 1.88927 |
| 4 | 0.961538 | 0.104011 | -0.481165 | 0.850229 |
| 5 | 1.45342 | 1.05774 | 0.165562 | 0.515018 |
| 6 | -1.33694 | 0.562861 | 1.39285 | -0.063328 |
| 7 | 0.121668 | 1.2076 | -0.00204021 | 1.6278 |
| 8 | 0.354493 | 1.03753 | -0.385684 | 0.519818 |
| 9 | 1.68658 | -1.32596 | 1.42898 | -2.08935 |
| 10 | -0.12982 | 0.631523 | -0.586538 | 0.29072 |
In [33]:
df.style.hide_columns(['C','D'])
Out[33]:
| A | B | E | |
|---|---|---|---|
| 0 | 1 | 1.32921 | -0.99081 |
| 1 | 2 | -1.07082 | 0.295722 |
| 2 | 3 | -1.6264 | 1.88927 |
| 3 | 4 | 0.961538 | 0.850229 |
| 4 | 5 | 1.45342 | 0.515018 |
| 5 | 6 | -1.33694 | -0.063328 |
| 6 | 7 | 0.121668 | 1.6278 |
| 7 | 8 | 0.354493 | 0.519818 |
| 8 | 9 | 1.68658 | -2.08935 |
| 9 | 10 | -0.12982 | 0.29072 |
CSS Classes
Certain CSS classes are attached to cells.
- Index and Column names include
index_nameandlevel<k>wherekis its level in a MultiIndex - Index label cells include
row_headingrow<n>wherenis the numeric position of the rowlevel<k>wherekis the level in a MultiIndex- Column label cells include
col_headingcol<n>wherenis the numeric position of the columnlevel<k>wherekis the level in a MultiIndex- Blank cells include
blank - Data cells include
data
Limitations
- DataFrame only
(use Series.to_frame().style) - The index and columns must be unique
- No large repr, and performance isn’t great; this is intended for summary DataFrames
- You can only style the values, not the index or columns
- You can only apply styles, you can’t insert new HTML entities
Some of these will be addressed in the future.
Terms
- Style function: a function that’s passed into
Styler.applyorStyler.applymapand returns values like'css attribute: value' - Builtin style functions: style functions that are methods on
Styler - table style: a dictionary with the two keys
selectorandprops.selectoris the CSS selector thatpropswill apply to.propsis a list of(attribute, value)tuples. A list of table styles passed intoStyler.
Fun stuff
Here are a few interesting examples.
Styler interacts pretty well with widgets. If you’re viewing this
online instead of running the notebook yourself, you’re missing out on
interactively adjusting the color palette.
In [34]:
from IPython.html import widgets
@widgets.interact
def f(h_neg=(0, 359, 1), h_pos=(0, 359), s=(0., 99.9), l=(0., 99.9)):
    return df.style.background_gradient(
        cmap=sns.palettes.diverging_palette(h_neg=h_neg, h_pos=h_pos, s=s, l=l,
                                            as_cmap=True)
    )
/Users/taugspurger/miniconda3/envs/travis-36-doc/lib/python3.6/site-packages/matplotlib/colors.py:504: RuntimeWarning: invalid value encountered in less
  xa[xa < 0] = -1
| A | B | C | D | E | |
|---|---|---|---|---|---|
| 0 | 1 | 1.32921 | nan | -0.31628 | -0.99081 |
| 1 | 2 | -1.07082 | -1.43871 | 0.564417 | 0.295722 |
| 2 | 3 | -1.6264 | 0.219565 | 0.678805 | 1.88927 |
| 3 | 4 | 0.961538 | 0.104011 | -0.481165 | 0.850229 |
| 4 | 5 | 1.45342 | 1.05774 | 0.165562 | 0.515018 |
| 5 | 6 | -1.33694 | 0.562861 | 1.39285 | -0.063328 |
| 6 | 7 | 0.121668 | 1.2076 | -0.00204021 | 1.6278 |
| 7 | 8 | 0.354493 | 1.03753 | -0.385684 | 0.519818 |
| 8 | 9 | 1.68658 | -1.32596 | 1.42898 | -2.08935 |
| 9 | 10 | -0.12982 | 0.631523 | -0.586538 | 0.29072 |
In [35]:
def magnify():
    return [dict(selector="th",
                 props=[("font-size", "4pt")]),
            dict(selector="td",
                 props=[('padding', "0em 0em")]),
            dict(selector="th:hover",
                 props=[("font-size", "12pt")]),
            dict(selector="tr:hover td:hover",
                 props=[('max-width', '200px'),
                        ('font-size', '12pt')])
]
In [36]:
np.random.seed(25)
cmap = cmap=sns.diverging_palette(5, 250, as_cmap=True)
bigdf = pd.DataFrame(np.random.randn(20, 25)).cumsum()

bigdf.style.background_gradient(cmap, axis=1)\
    .set_properties(**{'max-width': '80px', 'font-size': '1pt'})\
    .set_caption("Hover to magnify")\
    .set_precision(2)\
    .set_table_styles(magnify())
Out[36]:
| 0 | 1 | 2 | 3 | 4 | 5 | 6 | 7 | 8 | 9 | 10 | 11 | 12 | 13 | 14 | 15 | 16 | 17 | 18 | 19 | 20 | 21 | 22 | 23 | 24 | |
|---|---|---|---|---|---|---|---|---|---|---|---|---|---|---|---|---|---|---|---|---|---|---|---|---|---|
| 0 | 0.23 | 1 | -0.84 | -0.59 | -0.96 | -0.22 | -0.62 | 1.8 | -2.1 | 0.87 | -0.92 | -0.23 | 2.2 | -1.3 | 0.076 | -1.2 | 1.2 | -1 | 1.1 | -0.42 | 2.3 | -2.6 | 2.8 | 0.68 | -1.6 |
| 1 | -1.7 | 1.6 | -1.1 | -1.1 | 1 | 0.0037 | -2.5 | 3.4 | -1.7 | 1.3 | -0.52 | -0.015 | 1.5 | -1.1 | -1.9 | -1.1 | -0.68 | -0.81 | 0.35 | -0.055 | 1.8 | -2.8 | 2.3 | 0.78 | 0.44 |
| 2 | -0.65 | 3.2 | -1.8 | 0.52 | 2.2 | -0.37 | -3 | 3.7 | -1.9 | 2.5 | 0.21 | -0.24 | -0.1 | -0.78 | -3 | -0.82 | -0.21 | -0.23 | 0.86 | -0.68 | 1.4 | -4.9 | 3 | 1.9 | 0.61 |
| 3 | -1.6 | 3.7 | -2.3 | 0.43 | 4.2 | -0.43 | -3.9 | 4.2 | -2.1 | 1.1 | 0.12 | 0.6 | -0.89 | 0.27 | -3.7 | -2.7 | -0.31 | -1.6 | 1.4 | -1.8 | 0.91 | -5.8 | 2.8 | 2.1 | 0.28 |
| 4 | -3.3 | 4.5 | -1.9 | -1.7 | 5.2 | -1 | -3.8 | 4.7 | -0.72 | 1.1 | -0.18 | 0.83 | -0.22 | -1.1 | -4.3 | -2.9 | -0.97 | -1.8 | 1.5 | -1.8 | 2.2 | -6.3 | 3.3 | 2.5 | 2.1 |
| 5 | -0.84 | 4.2 | -1.7 | -2 | 5.3 | -0.99 | -4.1 | 3.9 | -1.1 | -0.94 | 1.2 | 0.087 | -1.8 | -0.11 | -4.5 | -0.85 | -2.1 | -1.4 | 0.8 | -1.6 | 1.5 | -6.5 | 2.8 | 2.1 | 3.8 |
| 6 | -0.74 | 5.4 | -2.1 | -1.1 | 4.2 | -1.8 | -3.2 | 3.8 | -3.2 | -1.2 | 0.34 | 0.57 | -1.8 | 0.54 | -4.4 | -1.8 | -4 | -2.6 | -0.2 | -4.7 | 1.9 | -8.5 | 3.3 | 2.5 | 5.8 |
| 7 | -0.44 | 4.7 | -2.3 | -0.21 | 5.9 | -2.6 | -1.8 | 5.5 | -4.5 | -3.2 | -1.7 | 0.18 | 0.11 | 0.036 | -6 | -0.45 | -6.2 | -3.9 | 0.71 | -3.9 | 0.67 | -7.3 | 3 | 3.4 | 6.7 |
| 8 | 0.92 | 5.8 | -3.3 | -0.65 | 6 | -3.2 | -1.8 | 5.6 | -3.5 | -1.3 | -1.6 | 0.82 | -2.4 | -0.4 | -6.1 | -0.52 | -6.6 | -3.5 | -0.043 | -4.6 | 0.51 | -5.8 | 3.2 | 2.4 | 5.1 |
| 9 | 0.38 | 5.5 | -4.5 | -0.8 | 7.1 | -2.6 | -0.44 | 5.3 | -2 | -0.33 | -0.8 | 0.26 | -3.4 | -0.82 | -6.1 | -2.6 | -8.5 | -4.5 | 0.41 | -4.7 | 1.9 | -6.9 | 2.1 | 3 | 5.2 |
| 10 | 2.1 | 5.8 | -3.9 | -0.98 | 7.8 | -2.5 | -0.59 | 5.6 | -2.2 | -0.71 | -0.46 | 1.8 | -2.8 | 0.48 | -6 | -3.4 | -7.8 | -5.5 | -0.7 | -4.6 | -0.52 | -7.7 | 1.5 | 5 | 5.8 |
| 11 | 1.9 | 4.5 | -2.2 | -1.4 | 5.9 | -0.49 | 0.017 | 5.8 | -1 | -0.6 | 0.49 | 2 | -1.5 | 1.9 | -5.9 | -4.5 | -8.2 | -3.4 | -2.2 | -4.3 | -1.2 | -7.9 | 1.4 | 5.3 | 5.8 |
| 12 | 3.2 | 4.2 | -3.1 | -2.3 | 5.9 | -2.6 | 0.33 | 6.7 | -2.8 | -0.2 | 1.9 | 2.6 | -1.5 | 0.75 | -5.3 | -4.5 | -7.6 | -2.9 | -2.2 | -4.8 | -1.1 | -9 | 2.1 | 6.4 | 5.6 |
| 13 | 2.3 | 4.5 | -3.9 | -2 | 6.8 | -3.3 | -2.2 | 8 | -2.6 | -0.8 | 0.71 | 2.3 | -0.16 | -0.46 | -5.1 | -3.8 | -7.6 | -4 | 0.33 | -3.7 | -1 | -8.7 | 2.5 | 5.9 | 6.7 |
| 14 | 3.8 | 4.3 | -3.9 | -1.6 | 6.2 | -3.2 | -1.5 | 5.6 | -2.9 | -0.33 | -0.97 | 1.7 | 3.6 | 0.29 | -4.2 | -4.1 | -6.7 | -4.5 | -2.2 | -2.4 | -1.6 | -9.4 | 3.4 | 6.1 | 7.5 |
| 15 | 5.6 | 5.3 | -4 | -2.3 | 5.9 | -3.3 | -1 | 5.7 | -3.1 | -0.33 | -1.2 | 2.2 | 4.2 | 1 | -3.2 | -4.3 | -5.7 | -4.4 | -2.3 | -1.4 | -1.2 | -11 | 2.6 | 6.7 | 5.9 |
| 16 | 4.1 | 4.3 | -2.4 | -3.3 | 6 | -2.5 | -0.47 | 5.3 | -4.8 | 1.6 | 0.23 | 0.099 | 5.8 | 1.8 | -3.1 | -3.9 | -5.5 | -3 | -2.1 | -1.1 | -0.56 | -13 | 2.1 | 6.2 | 4.9 |
| 17 | 5.6 | 4.6 | -3.5 | -3.8 | 6.6 | -2.6 | -0.75 | 6.6 | -4.8 | 3.6 | -0.29 | 0.56 | 5.8 | 2 | -2.3 | -2.3 | -5 | -3.2 | -3.1 | -2.4 | 0.84 | -13 | 3.6 | 7.4 | 4.7 |
| 18 | 6 | 5.8 | -2.8 | -4.2 | 7.1 | -3.3 | -1.2 | 7.9 | -4.9 | 1.4 | -0.63 | 0.35 | 7.5 | 0.87 | -1.5 | -2.1 | -4.2 | -2.5 | -2.5 | -2.9 | 1.9 | -9.7 | 3.4 | 7.1 | 4.4 |
| 19 | 4 | 6.2 | -4.1 | -4.1 | 7.2 | -4.1 | -1.5 | 6.5 | -5.2 | -0.24 | 0.0072 | 1.2 | 6.4 | -2 | -2.6 | -1.7 | -5.2 | -3.3 | -2.9 | -1.7 | 1.6 | -11 | 2.8 | 7.5 | 3.9 |
Export to Excel
New in version 0.20.0
Experimental: This is a new feature and still under development. We’ll be adding features and possibly making breaking changes in future releases. We’d love to hear your feedback.
Some support is available for exporting styled DataFrames to Excel
worksheets using the OpenPyXL or XlsxWriter engines. CSS2.2
properties handled include:
background-colorborder-style,border-width,border-colorand their {top,right,bottom,leftvariants}colorfont-familyfont-stylefont-weighttext-aligntext-decorationvertical-alignwhite-space: nowrap
Only CSS2 named colors and hex colors of the form #rgb or
#rrggbb are currently supported.
In [37]:
df.style.\
    applymap(color_negative_red).\
    apply(highlight_max).\
    to_excel('styled.xlsx', engine='openpyxl')
A screenshot of the output:
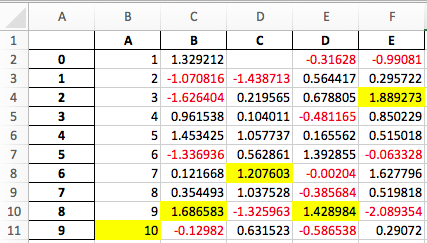
Excel spreadsheet with styled DataFrame
Extensibility
The core of pandas is, and will remain, its “high-performance,
easy-to-use data structures”. With that in mind, we hope that
DataFrame.style accomplishes two goals
- Provide an API that is pleasing to use interactively and is “good enough” for many tasks
- Provide the foundations for dedicated libraries to build on
If you build a great library on top of this, let us know and we’ll link to it.
Subclassing
If the default template doesn’t quite suit your needs, you can subclass Styler and extend or override the template. We’ll show an example of extending the default template to insert a custom header before each table.
In [38]:
from jinja2 import Environment, ChoiceLoader, FileSystemLoader
from IPython.display import HTML
from pandas.io.formats.style import Styler
In [39]:
%mkdir templates
mkdir: templates: File exists
This next cell writes the custom template. We extend the template
html.tpl, which comes with pandas.
In [40]:
%%file templates/myhtml.tpl
{% extends "html.tpl" %}
{% block table %}
<h1>{{ table_title|default("My Table") }}</h1>
{{ super() }}
{% endblock table %}
Overwriting templates/myhtml.tpl
Now that we’ve created a template, we need to set up a subclass of
Styler that knows about it.
In [41]:
class MyStyler(Styler):
    env = Environment(
        loader=ChoiceLoader([
            FileSystemLoader("templates"),  # contains ours
            Styler.loader,  # the default
        ])
    )
    template = env.get_template("myhtml.tpl")
Notice that we include the original loader in our environment’s loader. That’s because we extend the original template, so the Jinja environment needs to be able to find it.
Now we can use that custom styler. It’s __init__ takes a DataFrame.
In [42]:
MyStyler(df)
Out[42]:
My Table
| A | B | C | D | E | |
|---|---|---|---|---|---|
| 0 | 1 | 1.32921 | nan | -0.31628 | -0.99081 |
| 1 | 2 | -1.07082 | -1.43871 | 0.564417 | 0.295722 |
| 2 | 3 | -1.6264 | 0.219565 | 0.678805 | 1.88927 |
| 3 | 4 | 0.961538 | 0.104011 | -0.481165 | 0.850229 |
| 4 | 5 | 1.45342 | 1.05774 | 0.165562 | 0.515018 |
| 5 | 6 | -1.33694 | 0.562861 | 1.39285 | -0.063328 |
| 6 | 7 | 0.121668 | 1.2076 | -0.00204021 | 1.6278 |
| 7 | 8 | 0.354493 | 1.03753 | -0.385684 | 0.519818 |
| 8 | 9 | 1.68658 | -1.32596 | 1.42898 | -2.08935 |
| 9 | 10 | -0.12982 | 0.631523 | -0.586538 | 0.29072 |
Our custom template accepts a table_title keyword. We can provide
the value in the .render method.
In [43]:
HTML(MyStyler(df).render(table_title="Extending Example"))
Out[43]:
Extending Example
| A | B | C | D | E | |
|---|---|---|---|---|---|
| 0 | 1 | 1.32921 | nan | -0.31628 | -0.99081 |
| 1 | 2 | -1.07082 | -1.43871 | 0.564417 | 0.295722 |
| 2 | 3 | -1.6264 | 0.219565 | 0.678805 | 1.88927 |
| 3 | 4 | 0.961538 | 0.104011 | -0.481165 | 0.850229 |
| 4 | 5 | 1.45342 | 1.05774 | 0.165562 | 0.515018 |
| 5 | 6 | -1.33694 | 0.562861 | 1.39285 | -0.063328 |
| 6 | 7 | 0.121668 | 1.2076 | -0.00204021 | 1.6278 |
| 7 | 8 | 0.354493 | 1.03753 | -0.385684 | 0.519818 |
| 8 | 9 | 1.68658 | -1.32596 | 1.42898 | -2.08935 |
| 9 | 10 | -0.12982 | 0.631523 | -0.586538 | 0.29072 |
For convenience, we provide the Styler.from_custom_template method
that does the same as the custom subclass.
In [44]:
EasyStyler = Styler.from_custom_template("templates", "myhtml.tpl")
EasyStyler(df)
Out[44]:
My Table
| A | B | C | D | E | |
|---|---|---|---|---|---|
| 0 | 1 | 1.32921 | nan | -0.31628 | -0.99081 |
| 1 | 2 | -1.07082 | -1.43871 | 0.564417 | 0.295722 |
| 2 | 3 | -1.6264 | 0.219565 | 0.678805 | 1.88927 |
| 3 | 4 | 0.961538 | 0.104011 | -0.481165 | 0.850229 |
| 4 | 5 | 1.45342 | 1.05774 | 0.165562 | 0.515018 |
| 5 | 6 | -1.33694 | 0.562861 | 1.39285 | -0.063328 |
| 6 | 7 | 0.121668 | 1.2076 | -0.00204021 | 1.6278 |
| 7 | 8 | 0.354493 | 1.03753 | -0.385684 | 0.519818 |
| 8 | 9 | 1.68658 | -1.32596 | 1.42898 | -2.08935 |
| 9 | 10 | -0.12982 | 0.631523 | -0.586538 | 0.29072 |
Here’s the template structure:
In [45]:
with open("template_structure.html") as f:
    structure = f.read()

HTML(structure)
Out[45]:
<style type="text/css">
</style>
<table ...>
</table>
See the template in the GitHub repo for more details.